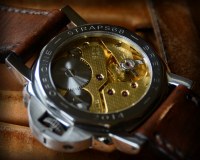
Hello I am very new here but have been on RWI since 2006. I would like to make an homage Panerai and am currently toying with a vintage 3646 or homaging this PAM01350 as I absolutely love the dial colour.
I wanted to know if anyone could point me in the direction of any dial painting tutorials where you can get this Degradé effect. I will probably end up getting a pro to make it but I would like to play around a bit first.
Any help would be appreciated.
https://ibb.co/jZR15fCP
Dial painting tips to get this look
-
Lefeuvre76
- Super Lost Sheep

- Posts: 19
- Joined: January 27th, 2025, 11:48 am
-
Onlinestraps68
- Sponsor

- Posts: 2504
- Joined: April 11th, 2018, 2:13 pm
- Location: Sandara Leatherworks
-
5 year veteran
Frequent Flyer
Moderator
VIP
Sponsor
Prolific poster
HF veteran
Strap maker
Re: Dial painting tips to get this look
Not sure if we have a tutorial on this but I imagine holding a disk mounted on a stick in front of the paint spray while "zooming" in or out.
straps68
My buckles My straps
Flickr: https://www.flickr.com/photos/sandara_l ... rks/albums
Builds: 6152/1 mini 2 mini 1 Ti

My buckles My straps
Flickr: https://www.flickr.com/photos/sandara_l ... rks/albums
Builds: 6152/1 mini 2 mini 1 Ti
-
erlendh
- VIP

- Posts: 367
- Joined: April 12th, 2018, 12:07 pm
-
5 year veteran
Frequent Flyer
VIP
HF veteran
Italiano addict
Re: Dial painting tips to get this look
If someone knows, I bet it's @Bigwaved
-
Hypnogagia

- Watch Addict

- Posts: 590
- Joined: June 30th, 2023, 1:49 pm
-
Big Wrist Man
Frequent Flyer
Re: Dial painting tips to get this look
I’m a total hack at all of this, but here’s my method
1- sand the dial, blow it off with the air duster and a brush. Use alcohol to clean. Paint with primer, let dry and cure under a heat lamp.
2- spray the full dial with the paint that will be the outside color, let dry and cure. Repeat a couple more times.
3- spray with a matte clear coat, dry and cure
4- spray with the center color, a couple of even coats on the entire dial, dry and cure
5- spray with matte finish clear coat, dry and cure
Now for the trick part, which may ruin all of your work, or may turn out perfect
6- Put a small piece of masking tape over the center hole on both sides, poke a hole for the center.
7- Mount the dial on a mandrel for a dremel or rotary tool. Make sure it’s secure. Run the rotary tool at the slowest speed and carefully apply sandpaper to the dial working from the edge to 2/3rds of the way to the center.
!!MAKE SURE THE SANDPAPER IS NEW AND CLEAN!!
Very light touch, just slowly sand away until the top coats of the paint fade away. those disposable nail files can work well. Just make sure the grit is 800-1000 or more, this part is very risky, as some mistakes can ruin the dial, or make it really interesting!
You’ll get the hang of it pretty quickly though.
Sand down the top layer until you’ve got the desired fade effect.
8- Remove the dial from the rotary tool. Very carefully remove the tape.
9- Blow the dial off with the air duster and hit it with another coat of matte finish clear.
It takes time, patience and practice, but works pretty well.
The masters on here I’m sure have much better methods, and I wish they would get together and write a book about dial painting (I’ll pre-order a copy!) but this is one that works pretty well.
I keep adding airplane parts to my motorbike but it still doesn’t fly
-
Lefeuvre76
- Super Lost Sheep
- Posts: 19
- Joined: January 27th, 2025, 11:48 am
Re: Dial painting tips to get this look
Thank you so much everyone - plenty to be getting on with here! Much appreciated.